

An electrical service upgrade involves bringing more power into your home or upgrading to a newer electrical mast, meter, panel, breakers, and wiring. A typical electrical upgrade requires updating your service from 60 amp to 100 or 200 amp. Here are the steps involved.
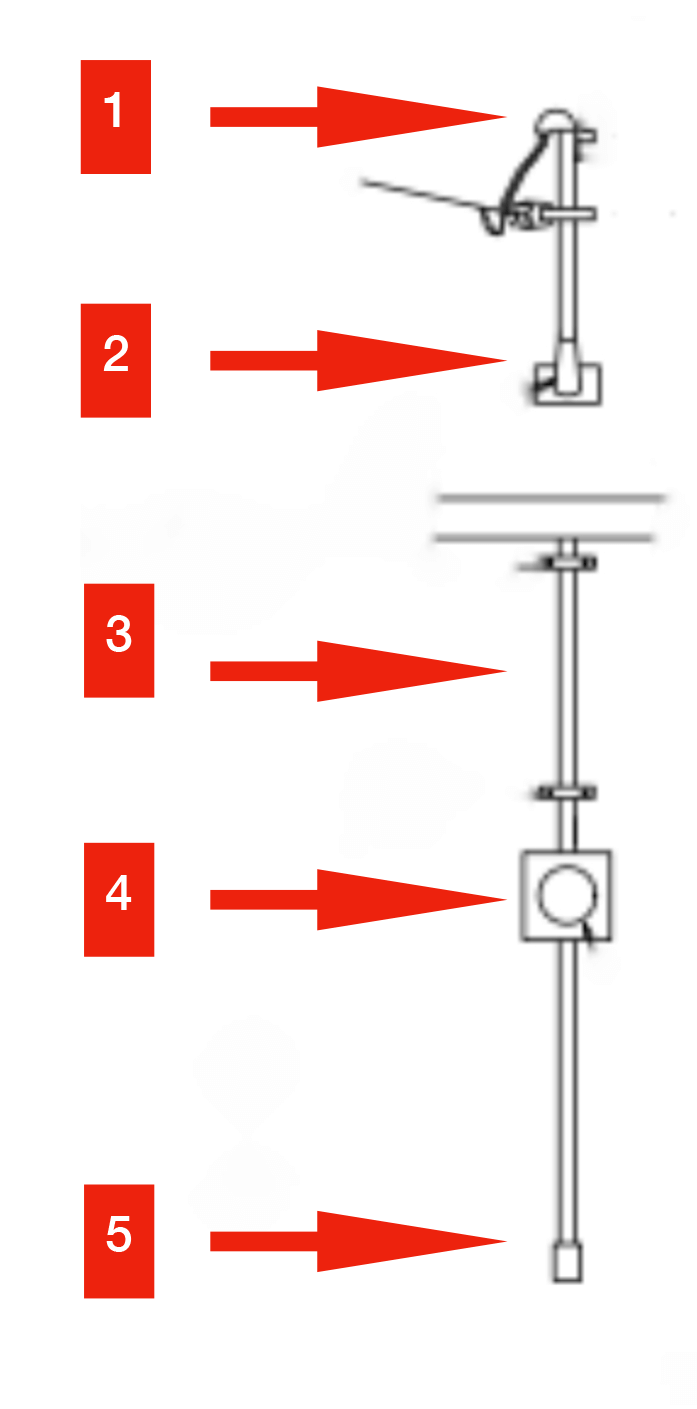
#1 The Weather Head and Clevis
This is where the overhead conductors from the pole in the alley attach to the house. The clevis is the anchor point that supports the overhead cables when you upgrade the service.
#2 The Roof Jack
The roof jack seals the conduit to the shingles or roof covering. We install a metal flange under the shingles and a rubber boot to prevent leaking. We install a seal under the soffits around the conduit, to prevent critters from entering the attic. Sometimes, the soffit material may get damaged due to obstructions when cutting. If this happens accidentally, the repair is your responsibility.
#3 Mast Clamps
There are 2 mast clamps used to secure the metal conduit (mast). These must go through the vertical wall stud and be secured with a washer and nut on the inside. We find the wall stud and drill out from the inside to determine where the mast will be placed. Sometimes we need to install these on the wall of a bedroom or bathroom or inside a kitchen cupboard. We normally drill about a 2.5″ hole in the drywall to install the nut and washer. We will use expandable foam to insulate inside the wall around the mast clamp bolt. The repair and painting of the drywall or cupboard interior will be your responsibility after service upgrades.
#4 The Meter Socket
The meter socket is the metal box in which the power meter is installed. If one exists, we attempt not to remove it because doing so will most times break the seal in the exterior house envelope, and allow water to enter behind the existing stucco or siding. With older homes, the stucco may be dry and brittle, so we take precautions when installing and working around meter sockets during service upgrades.
#5 Entering the Basement
We bring the new service conductors into the basement between the main floor joists, at or near the exiting basement panel. In order to bring the conductors into the house and into the panel, we must remove or cut any ceiling tiles or drywall at this entrance point. We will if possible, replace the tiles but it may be impossible due to the age of the material.
OUR QUALITY ASSURANCE
At ROBART ELECTRICAL SERVICES, we strive to provide professional and friendly service. After 40 years of experience with service upgrades, it has shown us that it is important to communicate the process of a service upgrade, to prevent any misconceptions. Despite our best efforts, minor damage may occur unavoidably, and the repair of this will be your responsibility.


